

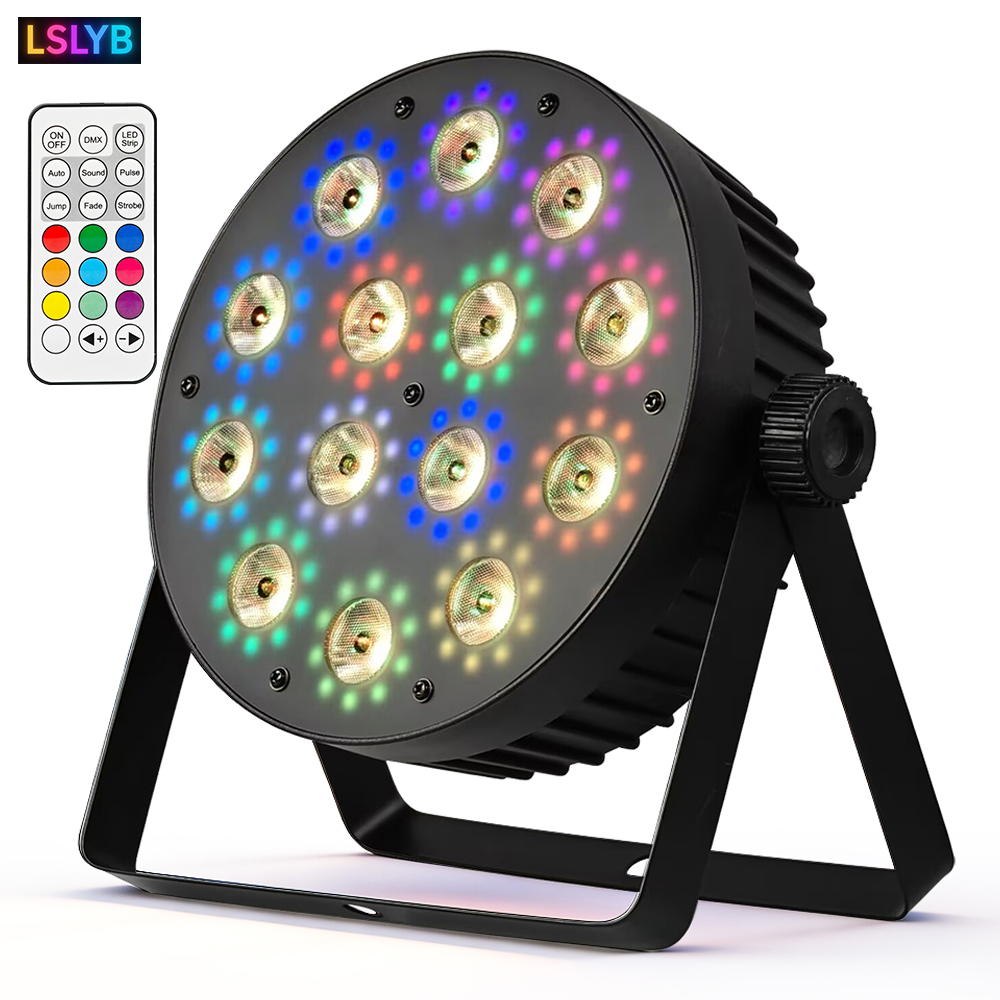


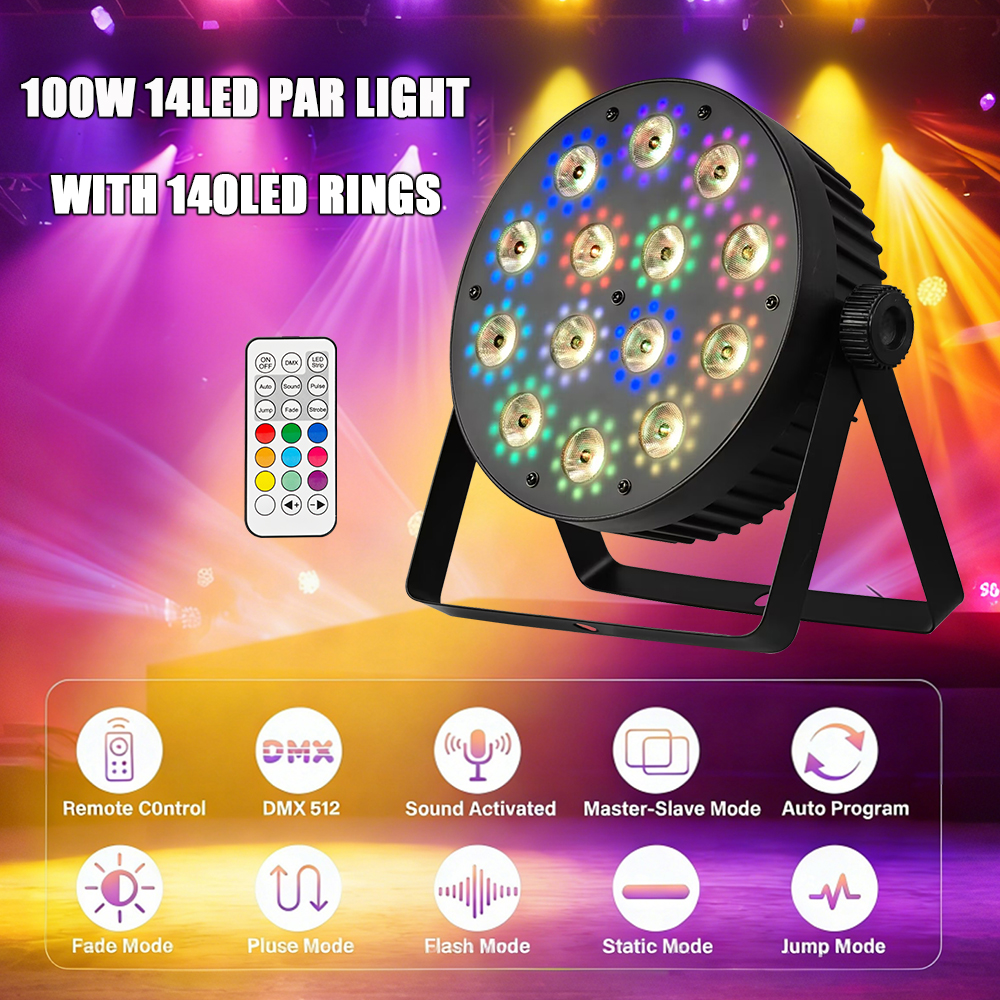
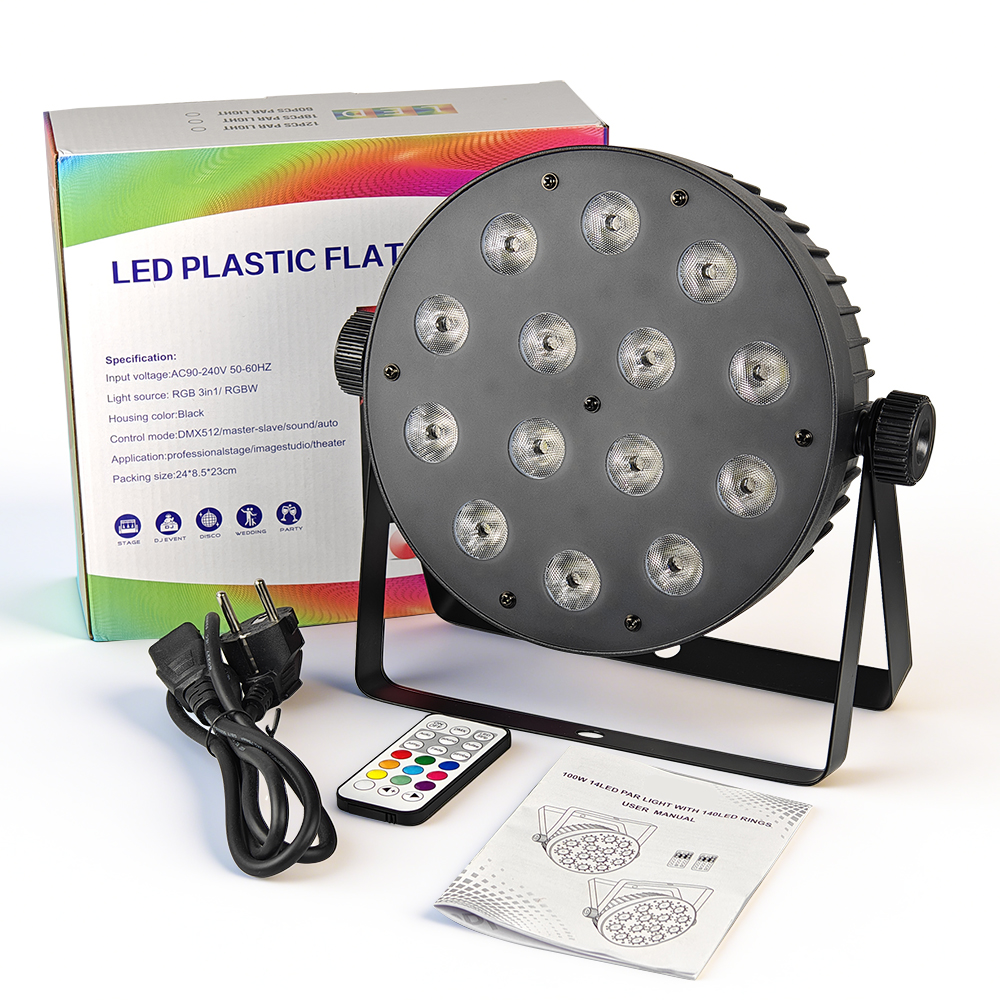
2026 New! 100W 14LED Par Light With 140LED Rings 2-IN-1 Multifunctional Stage Light With Remote Control Flat Par Lighting
-
Estimated Delivery:Jul 21 - Jul 25
-
Free Shipping & Returns: On all orders over $75
SPECIFICATIONS
Light Source:
Power Draw: 100 Watts
Voltage: AC110-240V, 50/60Hz
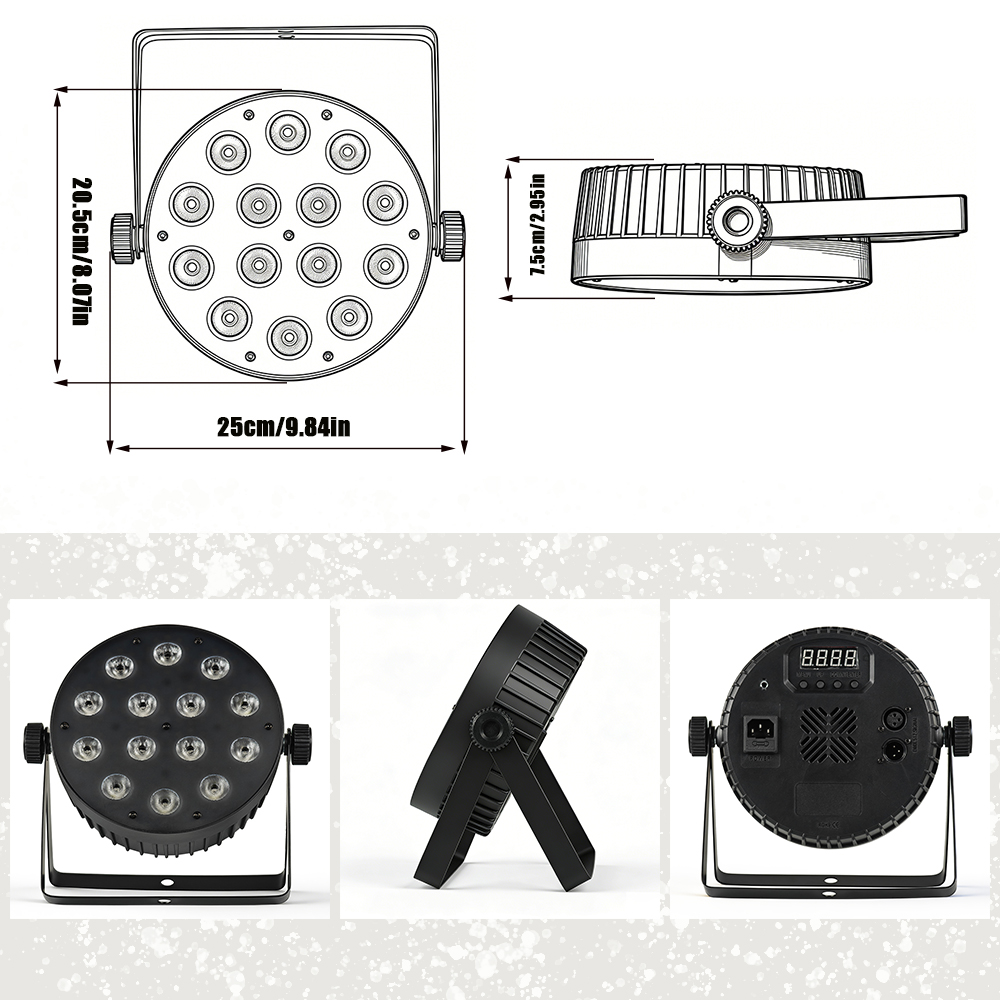
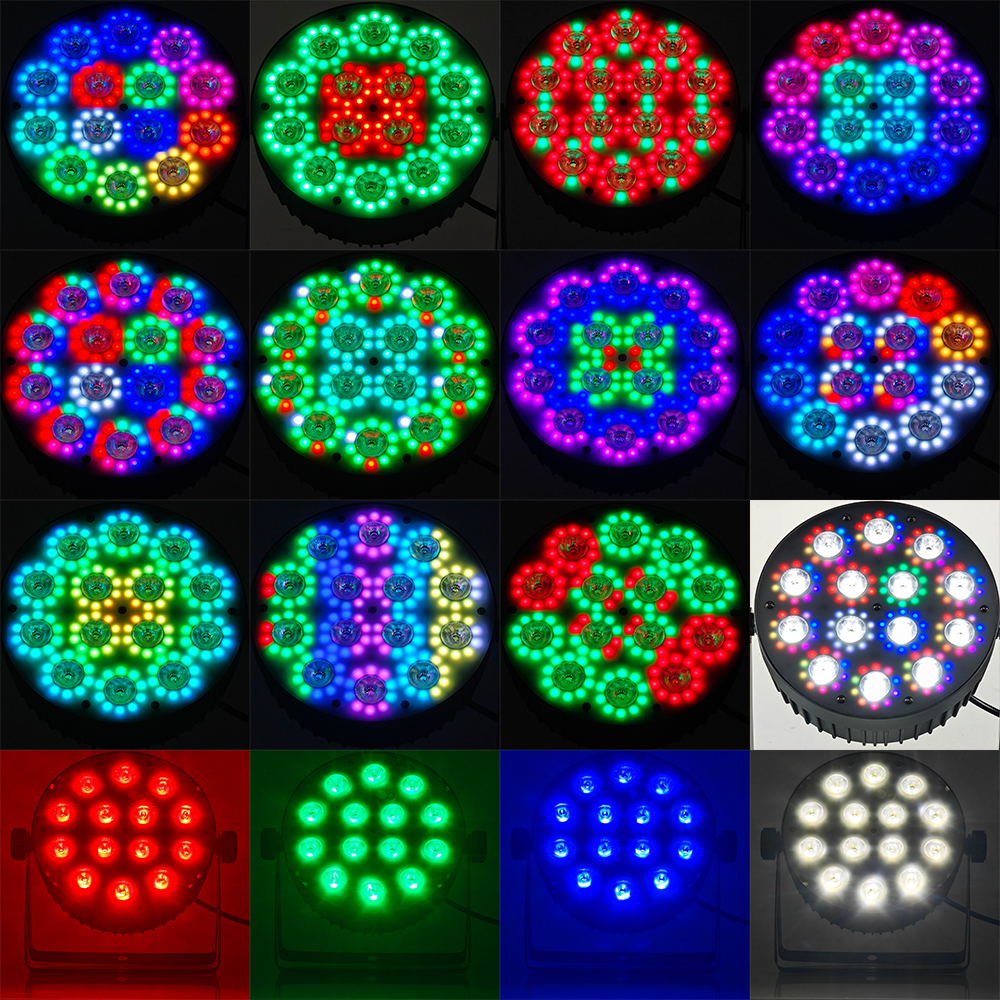
LED: 14PCS 4IN1 RGBW LED & 140 PCS 3IN1 RGB LED Ring
Beam Angle: 25°
Operation Mode: Auto, DMX512, Sound Active, Master-slave, Built-in Program, Static Color, Color Snap, Color Fade, Color Pulse, Strobe
Channel: 8 CH


Combined with the technical specifications of this lighting fixture, the structure and advantages of this dual‑LED light source system are as follows:
Light Source Structure
Main light source: 14 pieces of 4‑in‑1 RGBW LEDs (red/green/blue/white four‑color integrated)
Responsible for core lighting, it can produce pure white light and rich colors, with a beam angle of 25°, suitable for stage key lighting and highlight illumination.
Ambient ring light source: 140 pieces of 3‑in‑1 RGB LEDs (red/green/blue three‑color integrated)
It forms a circular lighting effect around the fixture, mainly for atmosphere creation and background decoration, and can be switched on/off independently (corresponds to the Lb00 function in the menu for turning off the ring light).

INSTALLATION
FLAMMABLE MATERIAL WARNING
Keep fixture minimum 8" (20cm) away from flammable materials and/or pyrotechnics.
ELECTRICAL CONNECTIONS
A qualified electrician should be used for all electrical connections and/or installations.
MINIMUM DISTANCE TO OBJECTS/SURFACES IS 1.6 FEET (0.5 METERS).
DO NOT INSTALL THE FIXTURE IF YOU ARE NOT QUALIFIED TO DO SO!
Fixture MUST be installed following all local, national, and country commercial electrical and construction codes and regulations.
Before rigging/mounting a single fixture or multiple fixtures to any metal truss/structure or placing the fixture(s) on any surface, a professional equipment installer MUST be consulted to determine if the metal truss/structure or surface is properly certified to safely hold the combined weight of the fixture(s), clamps, cables, and accessories.
Maximum ambient operating temperature is 104°F (40°C). Do not use fixture when ambient temperature exceeds this value.
Fixture(s) should be installed outside walking paths, seating areas, or areas where unauthorized personnel might reach the fixture by hand.
NEVER stand directly below the fixture(s) when rigging, removing, or servicing.
Allow approximately 15 minutes for the fixture to cool down before servicing.
SET UP
Power Supply: The par light supports wide voltage, which voltage range of 110 to 240 VAC, 50/60 Hz, no need to worry about the correct power voltage, and this unit can be plugged in anywhere.
DMX-512: DMX is short for Digital Multiplex. This is a universal protocol used as a form of communication between intelligent fixtures and controllers. A DMX controller sends DMX data instructions from the controller to the fixture. DMX data is sent as serial data that travels from fixture to fixture via the DATA "IN" and DATA "OUT" XLR terminals located on all DMX fixtures.
DMX Linking: DMX is a language allowing all makes and models of different manufacturers to be linked together and operate from a single controller, as long as all fixtures and the controller are DMX compliant. To ensure proper DMX data transmission, try to use the shortest cable path possible when linking several DMX fixtures. The order in which fixtures are connected in a DMX line does not influence the DMX addressing. For example, a fixture assigned a DMX address of 1 may be placed anywhere in a DMX line: at the beginning, at the end, or anywhere in the middle. When a fixture is assigned a DMX address of 1, the DMX controller knows to send DATA assigned to address 1 to that unit, no matter where it is located in the DMX chain.
Data Cable (DMX Cable) Requirements (For DMX Operation):The par light can be controlled via DMX protocol. The par light has an 8 channel DMX mode. Your unit and your DMX controller can accept a standard 3-pin XLR connector for data input and data output. Your cables should be made with a male XLR connector at one end of the cable and a female XLR connector at the other.
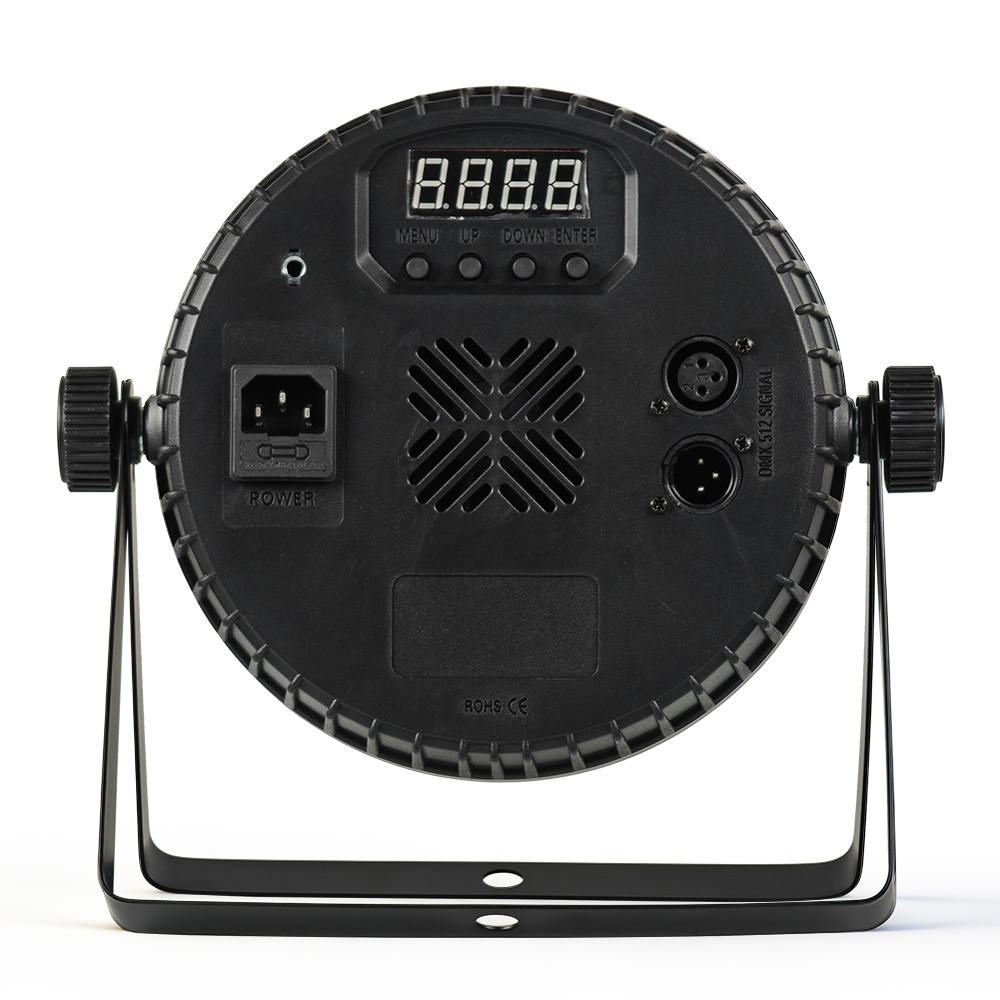
CONTROL PANEL
The fixture includes an easy to navigate system menu control panel display where all necessary settings and adjustments are made.
· MENU: Leave current menu and return to previous menu level.
· UP: Scroll up in currently displayed menu.
· DOWN: Scroll down in currently displayed menu.
· ENTER: Select an option or confirm a selection.
Slave units:
1.Press
2.Press to accept.
3.Connect the DMX input of the first slave unit to the DMX output of the master unit.
4.Connect the DMX input of the subsequent slave units to the DMX output of the previous slave unit.
5.Finish setting and connecting all the slave units.